
Introduction
“Alice started to her feet, for it flashed across her mind that she had never before seen a rabbit with either a waistcoat-pocket, or a watch to take out of it, and burning with curiosity, she ran across the field after it, and fortunately was just in time to see it pop down a large rabbit-hole under the hedge.
In another moment down went Alice after it, never once considering how in the world she was to get out again.
The rabbit-hole went straight on like a tunnel for some way, and then dipped suddenly down, so suddenly that Alice had not a moment to think about stopping herself before she found herself falling down a very deep well.” - Alice’s Adventures in Wonderland, Lewis Carroll
Welcome to the Internet…
Much like Alice in that wonderful tale, we sit at the entrance to a very deep tunnel. The internet is very much weirder than Carroll could ever have imagined. The sort of place where if you don’t keep your feet, there’s no knowing where you’ll end up.
So today, let’s take a baby step and look at the Week Three Maker’s Academy challenge. The Challenge Repository asks us to develop a website that allows us to play Rock Paper Scissors against a computer. We’re given two user stories, as well as two bonus challenges:
As a marketeer
So that I can see my name in lights
I would like to register my name before playing an online game

As a marketeer
So that I can enjoy myself away from the daily grind
I would like to be able to play rock/paper/scissors

Bonus level 1: Multiplayer

Change the game so that two marketeers can play against each other ( yes there are two of them ).

Bonus level 2: Rock, Paper, Scissors, Spock, Lizard

Use the special rules ( you can find them here http://en.wikipedia.org/wiki/Rock-paper-scissors-lizard-Spock )
As with the airport challenge let’s use TDD to build this website. This will be a series of blogposts exploring this solution. Today we’ll look at registering your name. But first we’ll need to take a quick detour to look at Capybara and Sinatra.
My final solution is hosted here if you care to see the final result first - Rock Paper Scissors Lizard Spock.
Zoology for Beginners - Capybara for tests.
So hopefully you’ve come across RSpec before. If not I recommend going to look at the Taking to the Skies blog post, which has a gentle introduction to Test Driven Development using RSpec.
Otherwise, let us proceed. When we build websites, we need to test our code at two levels. We continue to use unit testing to test our individual methods and classes, much like we did before. Vanilla RSpec is great for this and we’ll continue to use it today.
But we’ll want to also be able to test the website as a whole. That we don’t have any broken links, and that the site as a whole behaves as a user expects. These sorts of high level tests are called Feature tests, and we use Capybara for them.
Before we begin, we add the following three gems to our gem file, then bundle to install them.
source 'https://rubygems.org'

ruby '2.2.3'

gem 'rspec'
gem 'rspec-sinatra'
gem 'capybara'
We then run rspec-sinatra init myApp lib/myapp.rb to create the correct file structure to allow capybara to function.
Now we can write our first feature test. Let’s test that when we visit the homepage we are greeted by a page that says ‘please enter your name:’:
require 'spec_helper.rb'

feature 'New User arrives at root page' do
  scenario 'Displays form on the home page' do
    visit('/')
    expect(page).to have_content('please enter your name:')
  end
end
As you can see, we first must require the spec_helper at the top of our feature tests. This file holds all the instructions for Capybara as to how to run feature tests.
We then have a couple of new keywords. Feature is the equivalent of Describe in normal RSpec, and scenario similar to it.
Our first instruction tells Capybara to visit the applications homepage (‘/’). Once it’s there it expects to find the given content somewhere on the page.
We’ll use this sort of syntax throughout the rest of the blog, to test as we build.
Fly Me To The Moon - An introduction to Sinatra
As much as I revere the man himself, unfortunately we’ll have to explore his musical genius another time. For now we’re going to focus on the Sinatra framework.
Sinatra, is a simple ruby based framework for building websites. It provides a structure for interfacing with the HTTP requests we get when we visit a website, allowing us to serve dynamic content.
Building with Sinatra is fairly straight forward. We require the gem in our gem file:
source 'https://rubygems.org'

ruby '2.2.3'

gem 'sinatra'
And then run bundle. That’s about it. We’re now ready to start building.
Route 66 - Starting from the top
Alright, so we know a little of Sinatra and Capybara. But where do we start when building a website?
Lets look at the basic structure of a website. We’re going to use something called the Model-Controller-View structure (MCV):
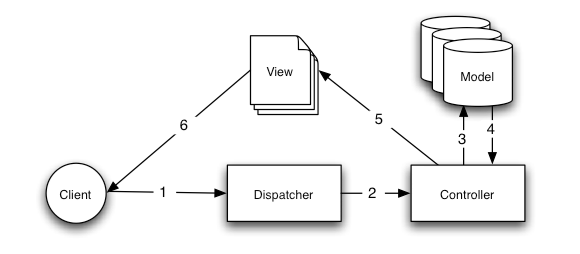
All looks a little complicated doesn’t it. Lets walk through what happens when you send a request to a website. Lets say you press a button to choose rock in our RPS game. You the client, send a request for a webpage to the server which holds that page (1). The dispatcher converts this from HTTP which is the language of the internet, to whichever language the server uses, in our case ruby, and passes it on to the controller (2).
The controller is in charge of deciding what to do with requests. It has a list of the requests it can accept, and a set of instructions of what to do if it receives that request. It probably has an instruction, that if it receives a certain request with a user choice (Rock, Paper or Scissor), that is should talk to a model (3,4). The model is responsible for any logic needed. In our case this may be to take the users Rock input, choose a random computer choice, and return the winner. This winner is returned to the controller.
Once the controller has the winner, it passes this onto the view (5). The view is where the actual HTML that will form the website you see is saved. We add in our dynamic content, ‘You Win’, and finally return this result to the user (6).
So with this knowledge in hand, we know where to start building our application. Lets define a route in the controller for our homepage. The controller should sit in the root directory of your project. In fact the file structure of these apps is very important: ├── lib │ ├── game.rb │ ├── computer.rb │ └── player.rb ├── spec | ├── features | | └── feature_test_spec.rb | ├── unit_test_spec.rb │ └── spec_helper.rb ├── views │ └── index.erb └── controller.rb The lib folder holds any models, the spec your RSpec tests including any feature tests, views go in the view folder, and the controller in the root directory.
require 'sinatra/base'
class RPS < Sinatra::Base
  get '/' do
    erb :home
  end
end
This route is activated whenever we receive a get request for the homepage, which is found at ‘/’. When it receives this kind of request it renders the view home.erb, and in so doing, doesn’t talk to the model at all. We don’t know anything about the user at the moment, so this makes sense.
So all we need to do is add a file into views called home.erb. But before we begin lets write a feature test for this. We visit the root path, fill in the form with our name, and then expect the new page to have content ‘Hello
require 'spec_helper.rb'
feature 'New User arrives at root page' do
  scenario 'User enters information' do
    visit('/')
    fill_in(:player_name, with: 'Reginald')
    click_button('single')
    expect(page).to have_content('Hello Reginald, please choose your move:')
  end
end
Having been good TDD users, lets write the view in html:
<html>
  <head>
  </head>
  <body>
    <div class = 'padding'></div>
    <div class = 'form_container'>
      <form action="/game" method="post">
        <label for="player_name">
          <input type="text" name="player_name" class='form_field' value = 'Enter Your Name'></input>
        <br>
        </label>
        <input type="image" name="gametype" value = 'single' src="single.png" class="home_icon"/>
        <input type="image" name="gametype" value = 'multi' src="multi.png" class="home_icon"/>
      </form>
    </div>
  </body>
</html>
This page has a form that allows us to enter our name, and two buttons, in the form of images that let us choose whether we want to play single player or multiplayer. We’ll stick to the single player version in this blog, but feel free to explore the multiplayer version on Github.
If you look carefully at the HTML you’ll see the form tag looks like this:
<form action="/game" method="post"> This tells the browser what to do when you press the submit button. In our case it says to send a POST request to the website/game path.
POST requests are the second most common type of HTTP request, and are used when we send data to the server. The alternative are GET requests, which you send whenever you simply request a page, for example when you first visit the homepage.
With this in place we can now run a local version of our application using rackup and then visiting localhost:9292 in our browser. The page will load, but once we hit singe player we get an error message!
Hitting the Big Time - Your Name on the Internet
Okay so we’ve got a form that sends a request to POST /game. Where to from here? Well clearly we need to define a route in our controller:
class RPS < Sinatra::Base
# Omitted Content...
enable :sessions

post '/game' do
  session[:player_name] = params[:player_name]
  session[:gametype] = params[:gametype]
  @player_name = session[:player_name]
  erb :game
end
There’s a little extra going on here. We’ve added a line enable :sessions. What this does it allow us to create a session, which stores data for the whole time a user is on our website. In the session we save the players name, and game type. These come from the params which are provided when you filled in the form on the homepage. We save this to an instance variable. Any instance variable we define here, will be accessible by the view we render, so we can pass on the name to the view.
Once we’ve saved these options, we direct you to the game page. This is the page that will allow us to choose which option we want to choose (Rock, Paper or Scissors). Let’s finish passing our earlier feature test. Here’s the html we need:
<html>
  <head>
    <link rel="stylesheet" type="text/css" href="style.css">
  </head>
  <body>
    <div class = 'header'>
      <h2>Hello,<%=@player_name%> please choose your move:</h2>
    </div>
  </body>
</html>
The player_name variable is included in a <%= %> tag. This is an embedded ruby (.erb) tag that tells the framework to evaluate the contents as normal ruby. So in this case it places the value of @player_name into the view. With this our feature test should pass, and we have completed our first user story.
Let’s leave it here for now; that was a lot of new content! I will continue exploring this problem in my next post. In the meantime, try not getting too lost in the rabbit-hole of the internet.
Leave a Comment